The welding of aluminium and its alloys
Fatigue strength of welded joints
Fatigue, as the name suggests, is a failure mechanism where the component fails after a period of time in service where it sees a repetitive cyclic stress. Failure may occur even if this stress is substantially below the yield strength of the metal as the other factor in causing failure is the number of stress cycles that the component experiences. Failure always occurs normal to the principal applied stress and the fracture surface is characterised by so-called ‘beach marking’ where changes in the stress level give different rates of crack propagation. This gives the surface a rippled appearance similar to a beach when the tide has ebbed away. The rate of crack propagation is proportional to the stress range and the crack length. Cracks in the early stages of growth tend to be very small and to grow slowly, making it easy for them to be missed during in-service inspection.
To be able to predict the fatigue life of a structure the designer needs accurate details of the full service loading conditions and accurate fatigue data on the performance of the component parts of the structure. The most common sites for initiation are weld toes, both root and face, drilled holes, machined corners and threaded holes. Of these sites the most significant are welds. Since welding has such a significant effect on fatigue life it will be necessary to specify welding details and controls rather more closely than for a statically loaded structure. This will, inevitably, have an effect on the cost of fabrication.
|
|
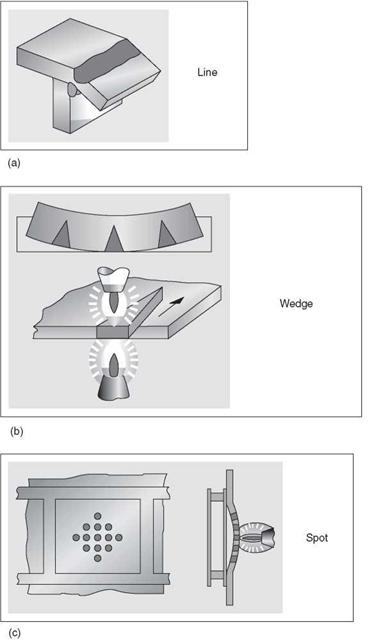
5.24 Rectification of distortion by (a) line, (b) wedge and (c) spot heating. Courtesy of TWI Ltd.
|
|
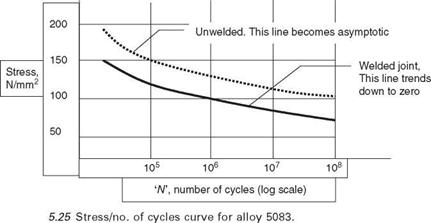
Fatigue performance can be represented graphically on an S/N curve where ‘S’ is the stress and ‘N the number of cycles to failure. For unwelded components a fatigue limit is reached where below a certain stress failure will not occur, irrespective of the number of cycles of stress it sees. A welded joint, however, does not exhibit a fatigue limit - failure will always occur if enough stress cycles are applied. These points are illustrated in the S/N curve in Fig. 5.25.
Welding results in a substantial reduction in the fatigue life and an elimination of the fatigue limit. This is such a dominant effect that there is little difference in fatigue life between the various alloys and tensile strength in this context is, to a great extent, irrelevant. The presence of welding defects will have an additional adverse effect, particularly those defects that may be classified as planar. Abrupt changes in section, notches and corners all reduce the fatigue life. Poorly shaped welds where there is a poor toe blend with the excess weld metal meeting the parent metal at a sharp angle (see the convex fillet in Fig. 5.7 as an example) are significant stress raisers. For the best fatigue performance the welds should be smoothly blended with no abrupt changes on section.
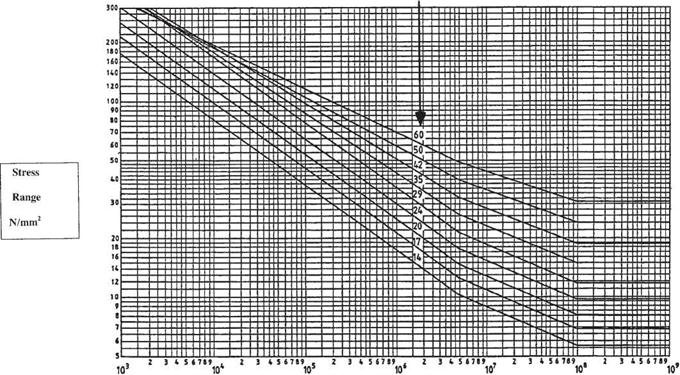
The corollary of this is that the form and shape of the weld will have a major effect on fatigue performance. Many specifications categorise the various weld forms and the direction of loading with respect to the fatigue life as shown in Table 5.1 parts a and b.
Apart from the need to ensure that the welds are smooth and well blended the orientation of the welded item to the principal stress needs to be taken into account. Fatigue improvement techniques comprise, firstly, eliminating the weld if possible or moving it to an area of lower stress. Redesign to a joint type with a higher category should be considered. If this
|
Description of detail |
|
Explanatory comments Examples showing crack sites |
|
BS 8118 BS 5500 Classification Classification |
Transverse butt weld
|
42 |
|
D |
Weld machined flush
7Г
|
35 |
|
D E |
|
Ж |
|
29 |
|
F |
|
24 |
|
As welded with good profile, weld blends smoothly with the parent metal, eg automatic weld Less desirable profile, welds with peaky profile, multiple stop/starts Backing strip weld without tack welds, cracking from root |
T-joint butt weld - full penetration
Butt weld - partial Fatigue life determined
penetration. on weld throat
Loadcarrying fillet welds
T - or cruciform Cracking may be at the
joints made with weld toe or in the weld
fillet welds throat
Non-loadcarrying attachments - butt or fillet welds
Attachments not Cracking starts at the
closer than 10mm weld toe.
from edge of stressed member
As above but Cracking starts at weld
within 10mm of toe.
edge of stressed member
W
|
14 |
20 F2 if plate
|
|
|
G |
stress, W if weld throat stress
|
Description of detail |
|
Explanatory comments Examples showing crack sites |
|
BS 8118 BS 5500 Classification Classification |
|
Fillet or butt Calculate peak stresses welded nodal joint acting on the joint |
|
24 (depends on loading regime) |
|
F or W |
|
|
|
Fillet and partial penetration butt welds in longitudinal shear |
|
Weld throat is used to calculate stress |
|
43 (automatic welds) 35 (multiple stop/starts) |
|
W |
|
|
|
ПК |
Classification No.
(above the stress or no. of cycles failure will occur)
|
No. of cycles |
cannot be done then thickening the component will reduce the stress experienced by the weld. The fatigue life of the weld can be improved by inducing compressive stresses at the toe of the weld. Overstressing the joint or hammer peening the weld toe will both do this, although great care needs to be taken that an over-enthusiastic application of either technique does not introduce defects. Dressing of the weld toes has been found to be an effective method but, once again, over-enthusiastic grinding can reduce rather than improve fatigue life. If the weld toes are ground this should be carried out by fully trained personnel. Grinding should be performed transverse to the weld toes in order that the grinding marks are parallel with the principal stress.


