The welding of aluminium and its alloys
Edge preparation and joint design
There are few more important decisions that affect the success of welding than that of correct joint design. Problems with weld quality or performance can often be attributed to the wrong design of edge preparation. Joint design is determined by the strength requirements, the alloy, the thickness of the material, the type and location of the joint, the access for welding and the welding process to be used.
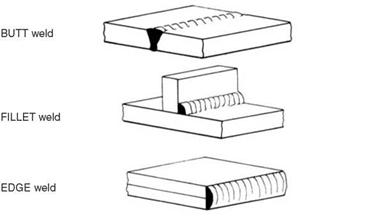
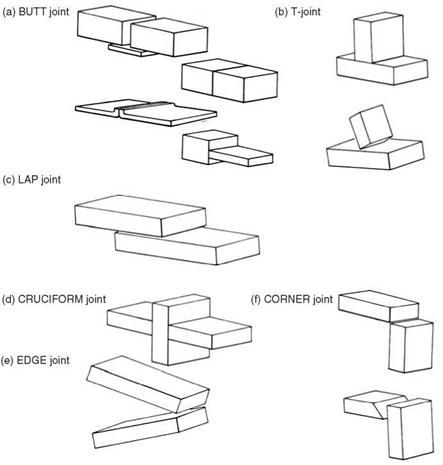
There are three fundamental forms of weld, the butt, the fillet and the edge weld, illustrated in Fig. 5.3, from which can be developed six basic joint types. These are the butt, T-joint, corner, cruciform, edge and lap joint, illustrated in Fig. 5.4.
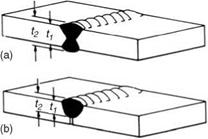
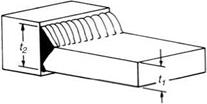
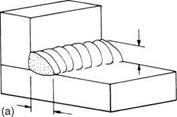
The static tensile strength of these weld types is determined by the throat thickness (Fig. 5.5). The size of a fully penetrated butt weld is determined by the thickness of weld metal deposited within the plane of the plate or
|
5.3 Butt, fillet and edge welds. |
|
5.4 Joint types developed from the butt, fillet and edge weld. |
|
|
|
|
(c)
|
|
|
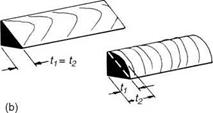
5.6 Throat thickness in a fillet weld: (a) fillet weld; (b) mitre and convex fillet weld. |
5.5 Throat thickness in a butt weld: (a) full pen butt weld; (b) partial pen butt weld; (c) T-butt weld.
pipe, 12 in Fig. 5.5. No credit is taken in calculating permissible static design stress of either a butt or fillet weld for the excess weld metal, i. e. that above the surface of the parent metal for a butt or outside the isosceles triangle of a fillet weld as given by (t2 - t2).
|
Convex fillet |
|
Mitre fillet |
|
|
■ 45° equal leg length, regular isosceles triangle convex face excess weld metal does not contribute to strength. Poor toe blend
|
Unequal leg length fillet |
|
L>> L |
|
|
|
concave face reduced throat thickness if judged on leg length |
|
Concave fillet |
1.7 Mitre, convex, concave and unequal leg length fillet.
For the fillet weld the shape of the weld and the amount of penetration into the root will affect the throat thickness. The effective throat thickness is tj in Fig. 5.6. The size of the fillet weld must be determined by the designer and should be of sufficient size to carry the load. The throat may therefore be completely different from the material thickness.
The fillet weld may also be described as a mitre, a concave or a convex fillet. In addition the fillet weld may have unequal leg lengths. These four types of fillet weld are illustrated in Fig. 5.7.
5.5.1 The butt weld
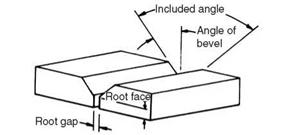
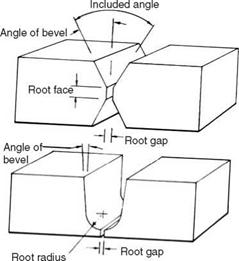
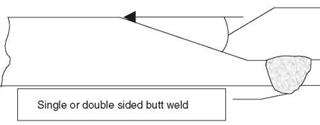
The butt weld, typical forms of which are illustrated in Fig. 5.8, is a simple and easily designed joint which uses the minimum amount of material. Figure 5.8 also includes definitions of some of the features of a weld preparation such as ‘root face’, ‘angle of bevel’ and ‘included angle’. Butt welds, as illustrated in Fig. 5.5, may also be classified as full penetration or partial penetration.
With the conventional fusion welding processes of TIG and MIG penetration of weld metal into the surface of a flat plate from a bead-on-plate run is typically 3 mm and 6 mm respectively. To achieve a full penetration butt weld at thicknesses over these it is necessary for the two close square - butted edges to be bevelled, although leaving a small gap between the edges will increase penetration. Typical weld preparations for the various processes will be found in the relevant process chapter. Butt joints may be single or double sided - if double sided it is often necessary to back-gouge or back-grind the first side to be welded to achieve a joint that is free of any lack of penetration.
Single - V
|
|
Double - V
|
|
Single bevel
Double - V
Single - V
1.8 Various forms of the butt weld.
|
|
|
taper of at least 4: 1 |
|
5.9 Suggested design for the joining of dissimilar thickness plates. |
The effective size of a full penetration butt weld equals the design throat thickness, essentially the plate/pipe thickness of the thinner component. As mentioned elsewhere no credit is taken for the weld metal cap height or root penetration bead. Although not often used in aluminium fabrications because of the need to match joint strength and base metal strength, in lightly loaded joints a partial penetration joint (Fig. 5.5b), may be acceptable. Partial penetration can be achieved by the use of a close square butt joint or a thick root face. There are cost benefits associated with the partial penetration joint as little or no edge preparation is required, it is economical on filler metal and it is easy to assemble since the root gap does not need to be controlled. The limitations are that radiographic interpretation is difficult due to the lack of penetration, the fatigue life is compromised and static mechanical strength is reduced. The effective size in the case of the partial penetration weld is the throat of the weld minus the cap height.
Where two sections of unequal thickness are to be welded the welder’s task will be eased and the best properties, particularly fatigue, will be achieved if the thicker of the two is bevelled or tapered to match the thinner. The taper on the thicker component to achieve this should be in the region of 4 to 1 to reduce the stress-raising effects of an abrupt change in thickness (Fig. 5.9).
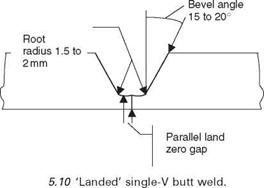
The weld preparation shape may be selected to achieve root penetration and a sound root, to permit the required pass sequence or to control weld metal dilution from the parent metal. The MIG process can, but with difficulty, be used to produce a sound, defect-free penetration bead - for a sound joint either a backing bar or strip needs to be used or the weld must be cut-back and a second side weld made. These techniques are dealt with in greater detail elsewhere. The TIG process can be used to make a sound, fully penetrated root bead without a cut back or backing strip. A ‘landed’ bevel joint (Fig. 5.10) is designed to enable the highest quality root penetration bead to be made using the TIG process. This is of use in applications such as pipe butt welding, where the welds need to be single sided and to have a smooth root bead that will not hinder flow in the pipe.
|
|
|
For AC-TIG welding the land should be 4.5 mm min, for DC - ve TIG and MIG the land should be 2mm min |
The strength of a sound, defect-free butt weld generally matches that of the filler metal or the annealed strength of the parent metal, as discussed in Chapter 2. The butt joint is the best in a dynamic loading environment, particularly if the excess weld metal is dressed flush. To achieve the best properties the two component parts require accurate alignment, which implies adequate tacking, jigging and fixturing.
5.5.2 Backing bars and backing strips
Although it is possible to deposit a sealing run on the reverse side of a butt weld without a back-gouge, this cannot be relied upon to give a sound, defect-free weld. Single sided joints may be welded by TIG to produce a sound root pass but the conventional (non-pulsed) MIG process often requires either permanent or temporary backing on which to deposit the MIG root pass. The purpose of the backing bar or strip is to support the root pass where conditions make the control of the bead difficult. Conventionally, a backing bar is temporary and can be lifted away as soon as the weld has been completed, and a backing strip is a permanent part of the joint. A backing bar or strip can greatly simplify the task of setting up the joint - for example, root gap variations are easily coped with and joints can be self-jigging, good root bead appearance can be achieved and costs can be reduced.
A grooved temporary backing bar will produce good penetration bead shape, the groove being used as a mould for the molten weld metal. This will provide a better dynamic performance than a permanent backing strip. Backing bar material can be an inexpensive mild steel but a longer life can be obtained from the bar with less risk of contamination if stainless steel is used. Ceramic backing, provided as a flexible strip of tiles or on adhesive tape, can also be used. Copper or copper alloys should be avoided because
|
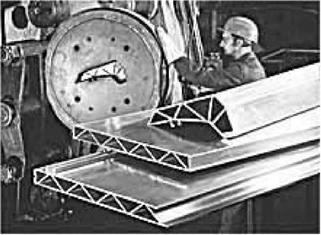
5.11 Typical self-jigging extrusions. Courtesy of ALCAN. |
of the risk of contamination. An ungrooved backing bar will need the root pass to be back-ground and perhaps a sealing pass to be deposited to produce a sound weld. If TIG welding using a backing bar the weld should be made with no root gap. This is necessary to prevent the TIG arc acting directly on and perhaps melting the backing material.
The permanent backing strip is fused into the root pass and care must be taken to select an alloy that is compatible with the parent metal and the filler. The strip should be in the region of 4-6mm thick and tacked in position. Many extrusions in aluminium, however, can be produced with the backing strip incorporated and in this way joint set-up is simplified. It is possible to design the extrusions with both the backing strip built in and of such a shape that the joint is self-jigging, as illustrated in Fig. 5.11.
The crevices associated with permanent backing strips result in local stress concentrations. These may reduce both impact and fatigue resistance if the root is in a highly stressed area. The crevice may also give rise to localised corrosion although even in marine environments this has not been reported as a major problem when the correct alloy has been chosen. Despite these potential drawbacks, permanent backing strips are a common feature in many structures used in challenging applications.
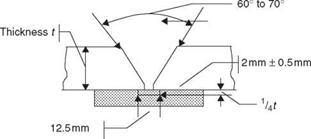
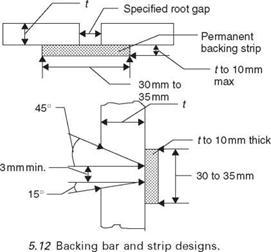
Inert gas backing can be used for critical applications such as food processing or pharmaceutical process pipework or vessels and is very useful when there is no access to the back of the weld to back-gouge and seal. An argon purge will prevent oxidation of the root penetration bead and oxide films being fused into the joint, giving a smooth, even TIG root bead. Typical designs of backing bars and strips are given in Fig. 5.12.
|
|
|
Temporary backing bar design for plate over 3 mm thick (TIG) or 6mm thick (MIG) |
|
The welding of aluminium and its alloys Thickness t" — |
|
Suggested design of a temporary backing bar for plate or pipe less than 6 mm thick |
|
Specified root gap |
Г л |
|
|
A |
||
|
A 4 |
Ш |
illWv |
|
Temporary backing bar |
|
|
|
Permanent backing strip design for both thick and thin plate |
|
Suggested weld preparation and backing strip for horizontal-vertical (PC) welding position |
|
5.5.3 The T-joint As the name infers, the T-joint (Fig. 5.4b) is one where one member is positioned at approximately right angles to its partner with the most usual applications being plate to plate or branch connections. The upright of the T may be joined by a butt weld, by a fillet weld or welds or by a combination of |
|
|
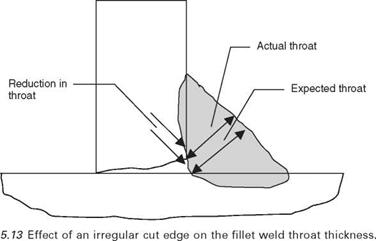
the two weld types (Fig. 5.5c). The T-joint is a simple, easily designed weld - ment which, except in the case of the T-butt, requires little or no edge preparation. The accuracy of the fit-up depends to a great extent on the accuracy with which the edge of the upright of the T is prepared. An irregular cut will give a variable gap, which may result in an inadequate throat thickness as illustrated in Fig. 5.13.
A fillet weld can present difficulties in achieving full penetration into the root, resulting in a void being formed in the corner. This is regarded as undesirable, particularly in critical applications, as this lack of fusion acts as a stress raiser in the root and also reduces the throat thickness. The welder needs to be made aware of this problem as the main cause is incorrect welder technique.
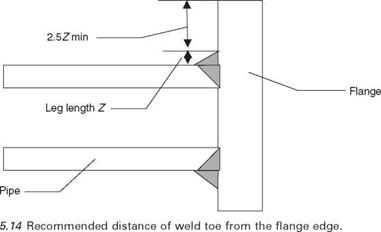
If the T-butt is a flanged joint, sufficient metal must be left that the weld does not melt away the corner of the flange and to allow for variations in fit-up. As a rule of thumb, some 2.5 to 3 times the fillet weld leg length is regarded as being adequate (Fig. 5.14). This may not prevent the edge of the flange from buckling due to distortion from the heat of welding, particularly where the fillet size is large in proportion to the flange thickness.
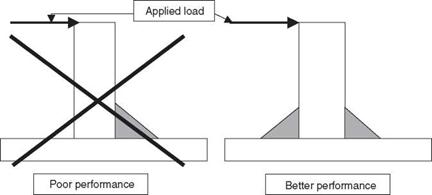
The strength of a fillet welded T-joint is determined by the shear strength of the fillet weld or welds, the strength of a butt-welded T-joint by the strength of the weld metal or the HAZ. If the joint is subjected to transverse shear loads the bending stresses in the joint can lead to premature failure, particularly if the joint is fillet welded on one side only. Fillet welds on both sides or a full penetration T-butt joint will permit substantially increased loads before failure occurs (Fig. 5.15). Dynamic performance of T-joints is not good: the change in section from the horizontal to vertical
|
|
|
5.15 Redesign of side loaded fillet welds for improved performance. |
member gives rise to high stresses at the weld toes, drastically shortening the fatigue life.
5.5.4 The corner joint
The corner joint may be regarded as a butt joint and is used to join two plates at right angles to each other (Fig. 5.4f). It can be difficult to assemble and maintain correct alignment, particularly in thin flexible sheet. The root of a single-sided weld when loaded in tension is very weak and for the highest strength the corner joint needs to be welded from both sides. The single-sided weld may also have a crease containing oxides along the centre line of the penetration bead, further reducing the strength of the weld. Pulsed AC-TIG has been found to be effective in reducing the occur
rence of this feature. The corner joint is most often found in low load- carrying applications and in sheet metal work.
5.5.5 The edge joint
The edge joint (Fig. 5.4e) is simple to assemble and to hold in position during welding. Like the corner weld, it is weak in loading situations that put the root in tension and is rarely used in a structural application, being confined to non-load-carrying applications in thin sheet metal. Melting of the corners of the edges being joined can be a problem and may result in a shallow, low throat thickness weld.
5.5.6 The lap joint
The lap joint is perhaps the easiest joint of all to assemble. It comprises two overlapping plates joined by a fillet weld (Fig. 5.4c). Variations in component sizes are easily accommodated and no edge preparation is required, although a bevel, as in Fig. 5.16, may be used to guarantee full root fusion.
The joint is uneconomical in terms of material as the overlapping material is waste. The overlap should be at least three times the thickness of the thinner plate. Care also needs to be taken to ensure that the weld does not melt away the corner of the upper plate as this results in a reduction in the effective throat thickness of the fillet.
The joint strength is set by the shear strength of the fillet weld. Weld sizes and lengths should be specified by the designer to guarantee adequate load - carrying capacity.
5.5.7 Spot, plug and slot welds
|
Bevelling the plate edge as above assists in achieving full penetration at the root |
|
A square edge as shown above may lead to difficulty in penetrating completely into the root, resulting in a lack of fusion defect and a reduction in throat thickness |
|
5.16 Bevelling the plate edge in a lap joint to improve penetration. |
Arc welded plug and spot welds are illustrated in Fig. 5.17. Both the TIG and MIG processes are capable of fully penetrating 2-3 mm through the upper sheet of a lap type joint to provide an acceptable weld. Laser and
|
|
|
Around 60° |
|
5.17 Plug and spot welds using TIG or MIG welding. |
electron beam welding are capable of spot and ‘stake’ welding through a substantial plate thickness, in the case of electron beam up to 200 mm.
TIG welding tends to be confined to thin sheet, less than 2 mm thick, and finds only a very limited application in production. The bulk of spot welding is performed using MIG welding and is covered in greater detail in Chapter 7. The designer must be aware, however, of the variable quality of the spot weld which results in low strength and poor fatigue performance. The high restraint inherent in this weld form almost always results in distortion, particularly when the welds are close pitched, and may produce hot cracks in the HAZ. These features limit the applications of spot welding.
Plug welding is similar to spot welding except that the upper plate is cut to provide a hole which is either completely filled with weld metal or is fillet welded around its rim. This type of weld suffers from the same problems of variable quality and inadequate strength as do the spot welds. They both tend to be avoided when structural integrity is required.
The slot weld is rather more useful in a structural application than the spot or plug weld since there is a reasonable length of weld to be deposited. This permits a stable weld pool to be established and a sound joint to be made. The weld may be a single pass completely filling the slot or it may be fillet welded both sides. For best quality the start and stop positions should be on the upper plate, clear of the slot. Fillet welded slots are preferred when the plate thickness exceeds 5 mm. The strength of a slot weld is determined by the shear strength of the weld deposit.
